Digital Landscapes
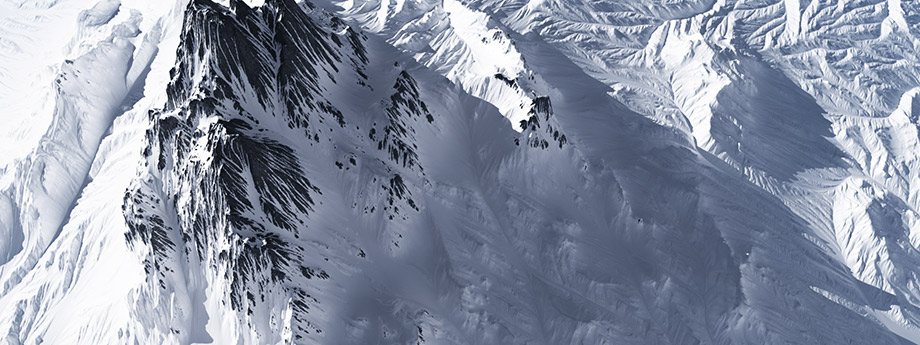
Some time ago I asked Mateusz Sroka about short making-of on his great digital landscapes images. Here is step by step instruction how to create such beautiful images in VUE and World Machine software. But first look what effect are we looking for:

1. Preparing the Scene
1. First I setup Gamma Options and change the all Gamma settings ( Gamma, Input/Output Gamma) from standard 1.8 to 2.2 – Vue uses a linear workflow (gamma=1), but other elements in your pipeline may not use this (cameras and monitors typically use a gamma of 2.2).

2. In next step set Units to Metric to have realistic display units to better navigate in me scene .

2. Build Procedural Terrain
1. At start I had to create a base (simple) model of terrain using procedural terrain , so I create procedural terrain and edit them . Leave all settings on left side of screen (especially zero edges who help me to create mountain on top terrain) and look to right side on tab Procedural and go to Edit Function.

2. Now you see all settings my procedural terrain. I use node – Terrain Fractal V2 and also Strata – Node for create simple base procedural terrain to next step. On screen you see all settings in two nodes. Leave two first Node on left side of screen and connect last one to the Terrain Fractal V2. The Terrain Fractal V2 Node connect with Strata Node and at end connect Strata Node to Altitude. All changes in setting will be see in Terrain Editor when you press right click mouse on Terrain Editor – so you can edit your terrain almost in real time. You can also use Function Output Observer to see all changes.

3. When I set all settings and save them, the next step will be increase resolution terrain you can do this click to x2 button or choose resize button. Increase resolution to 2K/4k depends how much have RAM. When you increase resolution you see more detail in terrain in preview and you can export more data to texture.

4. In Last step I export base terrain model to file, so I set Export terrain Options , and save terrain to .tga/tiff file 16/32 bit (more is better).

3. Create Erosion
1. After export terrain I use World Machine to create erosion and add detail to terrain. The first step will be add File Input Node and Load file with height map of terrain. Important is leave Altitude Scaling to Natural (file) Elevations. The File input you can find in Generator tab, after add File Input Node I click to Build Terrain ( but don’t save textures ) yellow button and see result in low resolution to fast work. I increase resolution in next step to see more detail.


2. In next step I create Erosion node and Height Output. Connect File Input with Erosion, and Erosion with all Height Output. The Erosion Node you can find in Natural tab and Height Output Node in Output tab. Connect nodes like on the picture. File Input load as simple height map terrain, Erosion add more detail to terrain and Heights outputs save all textures.

3. We must set all settings in Stochastic Fluvial Erosion Simulation, use Channeled Erosion, Simple Filter and Activate Geological-time Enhancment. You can use presets or do this manual, increase resolution in Project settings, build terrain yellow button and see results if is good go to next step if bad fix setting.

4. Now I set Heightfield File Output – choose TIFF/TGA

5. After this increase resolution terrain to 4096 – 4K in Project Settings, you can also resize terrain and set maximum Altitude of terrain. If you have small RAM use Conserve Memory.

6. Start build terrain – click green button, now terrain will bed build and after this all textures, meshes will be save. This process take a while.

7. And see how now looks terrain, all textures save after build terrain.

8. Final look to all textures, I use Height and Flow map in material editor in VUE.

4. Standard HQ Terrain
1. I must create a standard terrain to use Displacement on this terrain to create this same terrain like in World Machine after build terrain so I create Standard Terrain and increase resolution to 4K- The same like in World Machine. Next open Import Terrain Data/Picture – on left side of screen, and choose our Height texture – load Height map from World Machine as Picture.

2. Set Proportions to 100% leave Mixing mode to Blend and click Preview.

3. Now I have the same terrain like in World Machine so I go to create the scene with terrains, cameras and clouds.

5. Create Scene
1. In this task I create a good look scene. Place terrain in space, copy and place few more at distance. Set nice frame in camera and create few more cameras with other views. Use all views to set camera, terrain, sun and clouds. Copy the same terrain and scale, rotate them and place in good position to camera. Very important is to keep a good/realistic scale – for example this terrain have 5 km x km – Bad scale will be 500m x 500m for this big mountain. The scale of terrain if important to next step – set Atmosphere settings and especially scale of Atmosphere. This take a long time sometimes, the key is to find a good frame and build nice picture.


6. Create Materials
1. Now I go to create materials on my terrain, open material editor and choose Mixed material – to mix two materials. I create two materials – Snow and Rock and mix them together. Important is set Mapping to Object – Paramteric for all materials . The scale base material is set to 1, now I create Snow and Rock material.


2. Snow is simple white procedural color material with 0.1 scale. I set Highlight setting like Color – to blue and change Global intensity to more bright and set Highlight global size to more shiny. I leave Anisotropic highlighting but go to Effects tab and increase Diffuse and Ambient settings in Lighting tab to add more bright to snow material I also increase Luminous.


3. Second material is Rock and for this material I use Mapped picture mode and load Rock texture with Automatic Mapping and change Image scale to 0.06. Of course I set Highlight setting Color/global intensity/global size. I set this option to more Dull global size add little Anisotropic highlight.


4. In next step I set Distribution of materials 1 and 2. This Distribution settings will be control my Flow Map texture from World Machine. I edit Parametric settings Distribution, add Projected Texture Map and load my Flow Map form World Machine and Invert Map. In next step I choose Cover for Material mixing method and set Mixing proportions.

5. Last thing to do is set Influence of environment. Set all settings like Influence of altitude/slope Material 2 appears rather at high altitudes, altitude range By material and Coordinate system to World.

7. Camera, Light, Atmosphere, Clouds, Render Settings
1. I setup camera, choose Aspect Ration ( 8:3 ) for better looks, set Focal length and set Vue Exposure Filter with Natural film response to add little post-pro at start.

2. Next I go to Atmosphere Editor and set Sun settings- use custom setting. Place sun in good place to add climate and good look light to scene.

3. In next step I go to Light setting and choose Global radiosity for Lighting model. Set manual Global lighting adjustment , Ambient light color and shadow smoothing, Sky dome lighting gain, Overall skylight color and gain of Global Radiosity. I use Global Radiosity because this lighting model gives best results in environment rendering but render time is longer than others.

4. I go to Sky, Fog and Haze tab and set all setting so that scene looks realistic and good. In Vue camera you see all changes when you for example change the Sky mean altitude, I tray to set all setting realistic but do not always is recommended the key is to set all this setting to have a good look picture. If quality of image is not goo you can increase Quality boost form standard -1 to None or 1. Very important is to good set Aerial perspective – is a scale of our Atmosphere when you change this all settings in Sky, Fog and Haze will be change. On the picture you see my setting for this scene with good scale so I don’t need to change Aerial perspective.

5. Next I add simple clouds – Stratus, set Altitude and Scale. Place this clouds manual in camera view because preview can display clouds in view so is very helpful.

6. Last thing to do is setup Render Options. I use User setting set all setting like Anti-Aliasing – set Anti – Aliasing strategy to Soft, set Subrays per pixel ( min – 5, max – 10 ) set maximum Quality threshold, don’t use Texture Filtering and Texture anti – aliasing, Advanced effects quality set to standard 46% and other things. I render in resolution 1920×720 and save render to 16 bit TIFF file.


8. Postproduction
1. I do postproduction on only one beauty layer render in two programs – Magic Bullet Looks and Nik Color Efex Pro. In Looks I setup Curves ( all channels + luminosity) , set Highlight, Midtone and Shadow (color and luminosity) and also add simple Diffusion (glow) and Lightflex to add little lift on image. Save to 16 bit TIFF and open in Nik Color Efex.

2. In Color Efex PRO I do final look image. Setup saturation, add few filters, setup contrast and add glow and Sunlight. Add cold feel to image, bright snow and add to them little glow and fog to image. In the last step I sharpen the image and save. That’s everything, remember the good render is very important thing to do a good post – pro/color correction/grading on image. The render must be not clamped 16/32 bit without loss quality. You can also export more passes ( mask for mountain, atmosphere… ) to bigger post – pro. I wanted to do post-pro to only one beauty layer like photographer do color correction on photos without any others passes or masks.


